 I received a plaintive cry for editing help from our esteemed ERWA Editor in Chief, Sam Thorne, the other day.
Hello oh wonderful soul of lasting genius1
I wondered if you knew how to search for words that were all caps and change them to lower-case italics, using the find-replace function.
(1 That, my friends, is how you suck up)
The problem for an editor is pretty clear: we are editing a manuscript that over-uses CAPS for exclamations, which is poor form, and seek to re-cast the emphasis with … well, emphasis. Specifically, lower-case italics.
For example:
“For the hundredth time,” cried Tom, “I’M NOT FUCKING SHOUTING!”
Would become:
“For the hundredth time,” cried Tom, “I’m not fucking shouting!”
How hard could it be, right? Well, here’s the thing—I’ve spent more time than is healthy mucking about with features in Microsoft Word, and I’m no stranger to the finer points of the Find-Replace dialogue box—but changing case in Word? Man, that’s a tough one.
With the benefit of a mis-spent youth recording and tweaking Office macros, I knew this problem was bog-simple to solve in a Visual Basic macro. To that end, I wrote Sam a quickie macro and flung it off back to the mother country, but then just yesterday while I was scrying for blog ideas, it came to me—maybe it CAN be done with Find-Replace. Well, part of it, anyway. Read on; you’ll see.
Like any good overly-complicated solution, while it’s ugly to look at, it comprises some individual techniques that are really quite beautiful—ones I will definitely keep in my arsenal for solving other problems—and I thought it might be instructive to share the joy.
If you’re the impatient sort, skip to the bottom and watch the video demo.
Disclaimer: I’m using Microsoft Office 2016. Your version may look different.
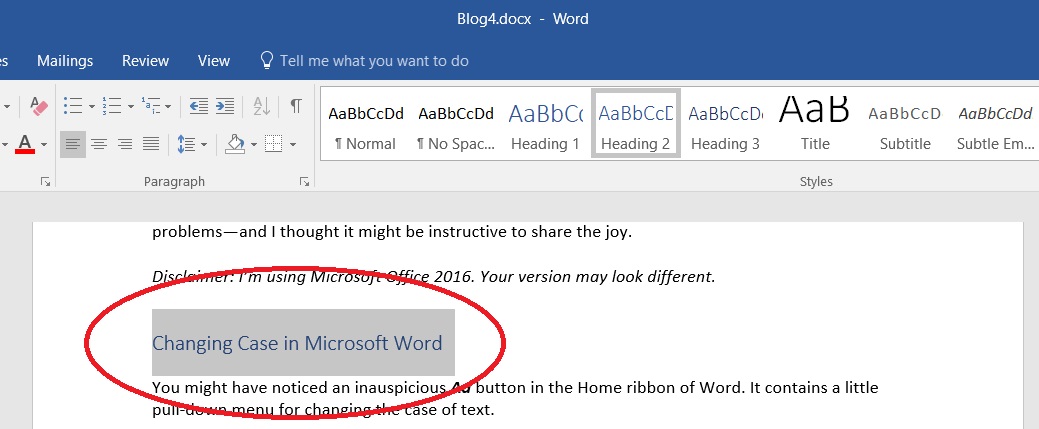
Changing Case in Microsoft Word
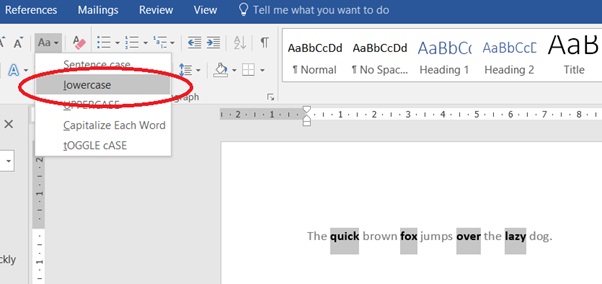
You might have noticed an inauspicious Aa button in the Home ribbon of Word. It contains a little pull-down menu for changing the case of text.

Problem solved? Not quite; Sam’s manuscript contains LOTS of shouting in LOTS of different places. Highlighting every instance and clicking lowercase is the labour-intensive process she’s trying to avoid.
Clearly, we can’t convert the entire document to lowercase. That Sentence case looks interesting, though. What if we convert the entire document to sentence case? Unfortunately, it only seems to apply changes if the first word of a sentence needs correction, otherwise it changes nothing. Here’s some sample I text I played with:
Original:
What the HELL, Microsoft Word? This is NOT how I imagined my Saturday.
Lowercase:
what the hell, microsoft word? this is not how i imagined my saturday.
Sentence case:
What the HELL, Microsoft Word? This is NOT how I imagined my Saturday.
Lowercase, then Sentence case:
What the hell, microsoft word? This is not how i imagined my saturday.
That last one was close, but it ruined the proper nouns like Microsoft Word, and Saturday.
Trying to manipulate the entire manuscript isn’t going to work. We need a way to focus only on those uppercase words.
We can do this manually by holding down Ctrl and highlighting all the words we want to manipulate.

Gives us:

And since those converted words are still highlighted, we can convert them to italic in a single click.

It’s not a solution, as such, but it’s progress. Now, if only there was a way to select/highlight all the uppercase words.
Finding Patterns with Wildcards and Advanced Find
How do you find stuff in Word? Do you hit Ctrl-F? Or do you use the magnifying-glass Find command on the Home ribbon?

BZZZT! Novice—or as gamers would say—You filthy CASUAL!!!
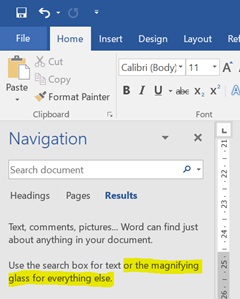
Find will pop up the Navigation window in the left sidebar, which is fine if you’re looking for some very specific text, but it’s not exactly feature-rich. When you’re seriously editing, this is like bringing a knife to a gun-fight, aspirin to a crack-den, edible underwear to a dinner party…
You get the idea.
When you want to find something tricky, like for instance something in all upper or lower case, you’re going to need something a bit more capable.
Enter the Find-Replace dialogue.
You can get there from the Find sidebar by clicking Advanced Find off the pull-down menu.
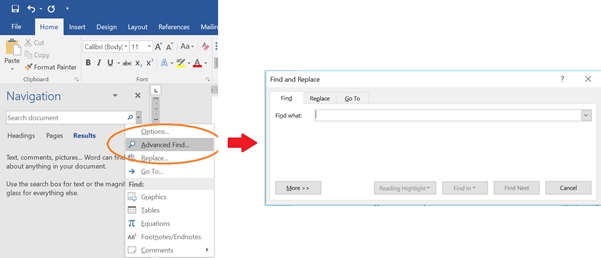
You can also get there with Ctrl-H, but that pops up to the Replace tab of the dialogue by default. Let’s take a closer look at that Advanced Find tab.
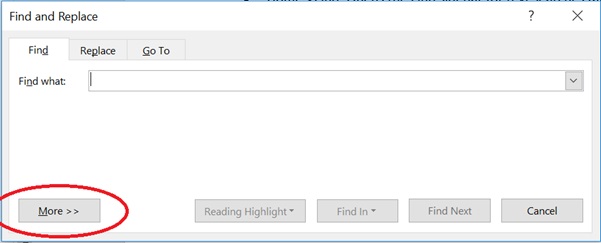
Doesn’t look too advanced, does it? Well, no—not until we click the More>> button.
There are a lot of fun-sounding features here, but the one we’ll be using is Use wildcards. I’ll leave the rest to your curiosity.
If you’ve heard of wildcards before, you might be thinking of the asterisk, meaning “match any sequence of characters”. For example, a search for the wildcard SLEEP* will find SLEEPY, SLEEPER, SLEEPLESSNESS, and even SLEEP.
The Advanced Find wildcard does indeed support the asterisk wildcard, but it does much, much more—way too many to mention here. Since I’m only interested in finding words in all-caps, I’m only going to explain two of the wildcards (or, as they’re known technically, Regular Expressions):
- [x–y] – Matches a single character in the range from x to y in alphanumeric order. Eg. [A-Z] matches a single uppercase character.
- {n,} – Matches the previous Regular Expression n or more times.
In this way, the Wildcard search:
[A-Z]{2,}
will find any string of two or more capital letters. Let’s try it out.
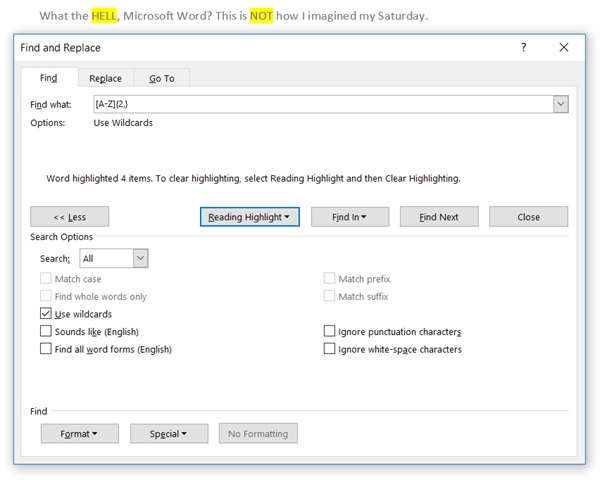
Nice. Notice how it doesn’t match the single caps character “I”?
This isn’t perfect—it won’t capture some edge cases where a single character is orphaned by punctuation (e.g. I’M, F.B.I., O’CONNOR, TOM’S, ISN’T). This is easily fixed with a more complex expression, but I won’t go into a detailed description. Suffice to say it handles embedded punctuation.
<[A-Z][!a-z]@>
It seems like we’re almost done. Now all the all-caps are highlighted, surely we just his up that Aa button and convert them to lowercase, right?
Wrong. Although we managed to highlight them, they are not selected as far as Word is concerned. If we try hitting Aa, we’ll just change the case of whatever words we had selected prior to the Advanced Find.
What about Advanced Replace? I hear you ask. It’s no help either. We can do a lot with Replace—apply fonts, highlighting, paragraph spacing, even styles, but we can’t convert to lowercase.
It seems like we’ve hit a dead-end. We need a way to progress from finding the all-caps words to selecting them in order to then convert the case and italics.
Select All using Styles
Fortunately, there is a tricky work-around—there is one way to bulk-select all text of a particular type by using Styles. Try this: pick out a Style that you have examples of in your document, and right-click it in the Style Selector in the ribbon.
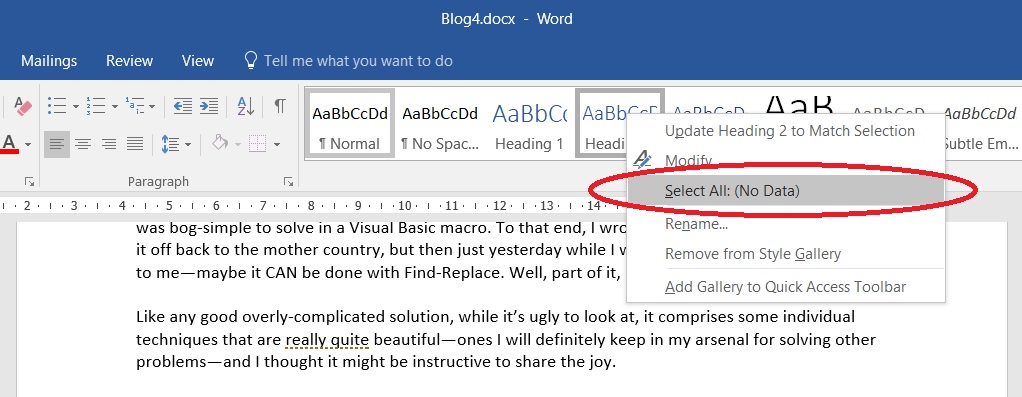
See that Select All option? Click it.
Word will select all examples of that Style in the document. Once selected, you can make all kinds of bulk changes, like formatting, deleting, changing style, and of course, changing case.
If only we had a way to apply a special style to those all-caps words we found.
Hopefully you’ve connected the dots by now. “But what about the Replace function?” you ask. “Can we use it to find the caps, apply a style, and then use Select-All to snaffle them all up and convert to lowercase?”
You betcha! And here it comes.
Find Text and Apply a Style
Using the Find-Replace dialog again:
- Ctrl-H to open Replace dialogue.
- Find what: <[A-Z][!a-z]@> (finds all-caps words of two or more characters)
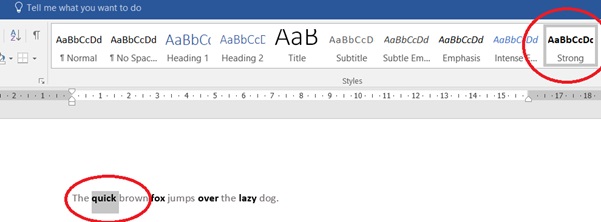
- Replace with: (leave blank—open the Format->Style button and choose a Style you have not used elsewhere in the document, such as “Strong”)
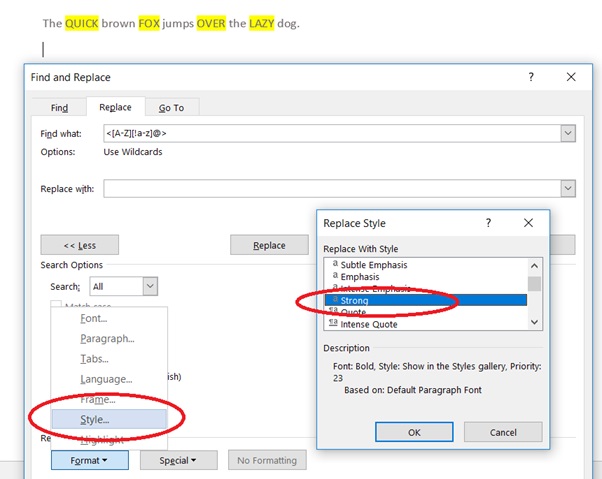
- Hit Replace All

Obviously, we’re only halfway there. The caps words are still caps; they’re bold as well, of course, because we chose the “strong” style, which is a bolded style. We could equally have made our own custom style that didn’t change the font style, but the bolded text makes it easier to see that it worked, so I like it.
Now, to convert to lowercase:
- Right-click the Strong style and Select All
- Use the Aa button to convert to lowercase, or even better, Sentence case.
- Optionally use the Italic button to convert to italics (this is what Sam wanted instead of caps to emphasise the shouting).
Fantastic! We’re done.
Or are we? The words are lowercase now, but they’re still bolded. That’s because they still have the Strong style applied. We have one last step to complete.
Stripping a Text Style
If we click on one of those bolded words, we’ll see the Strong style highlighted in the ribbon.
Whereas if we click on the paragraph as a whole, it will still have the default style of the paragraph (usually “Normal”).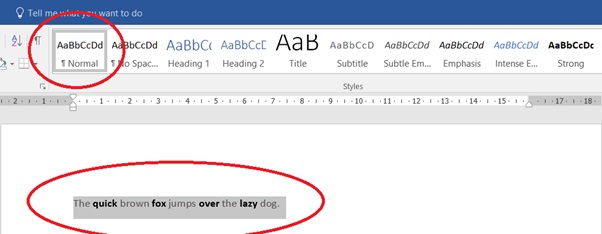
Microsoft Word calls these Text Styles and Paragraph Styles respectively. The Paragraph Style defines the font, size, colour, etc for the entire paragraph, but it can be overridden for selected sections of text using a Text Style.
We can strip the Text Style, returning the converted words to the paragraph style.
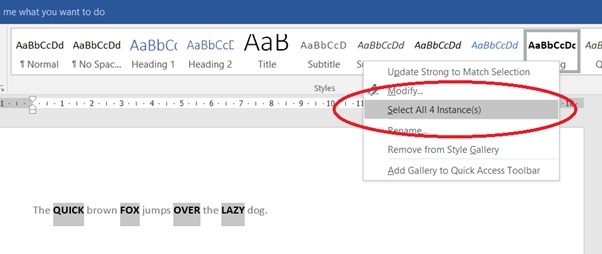
- Right-click the Strong style and Select All Instances to highlight all your converted text.
- Pull down the Styles toolbox using the small arrow in the corner of the Style selector in the Home ribbon. Make sure the Strong style is highlighted.
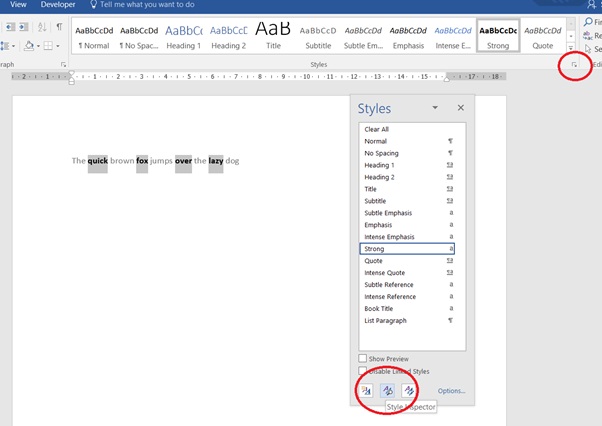
- Open the Style Inspector dialogue by clicking the middle of the three buttons at the bottom of the Styles toolbox (the one with a magnifying glass).

This dialogue shows the Paragraph Style and the Text Style of the selected text.
- Now click the eraser button next to the Strong style name in the third box. It will return the highlighted text to the default Paragraph Style, removing the bold highlight from the text.
- Note that if you had added italics above, this will appear in the fourth box, but will be conveniently preserved by the removal of the Text Style.
Summary
That’s it! You’re done. All your uppercase words are now lowercase (or Sentence case, if that’s what you clicked). Those steps again:
- Use Advanced find to identify all CAPS words (Wildcard find: <[A-Z][!a-z]@>)
- Use Replace to apply a style not used elsewhere in the document (eg. Strong)
- Highlight all examples of the Strong style using the Style selector
- Convert to Sentence Case
- Optionally convert to italics
- Strip the Text Style using the Style Investigator
More of a visual person? That’s okay, here’s a video demonstration.
Happy editing.


Belinda,
You continue to impress me and here I thought you were just a pretty face!
Now I find that you know how to use Regular Expressions, which are only known by programmers and not many nowadays. Since we’ve moved away from programming editors and switched to the built-in editor, Regular Expressions have fallen out of use.
Great article on Regular Expressions, atta-girl!
Thanks Larry. I think a blog on regular expressions would be long one indeed. Best case, I’ve piqued someone’s interest to dig deeper. Sounds like you already know how to use them, so case closed.
Belinda
Okay, Belinda — how long did it take for you to figure this out?!
Brilliant!
Too long!!! If only I could get it all back.
This is genius. I’m more than impressed – though I wonder why Sam didn’t just send the manuscript back to the author with the message: ‘Oi, Twatty – change your all caps to italics and send me the new version.’
That’s what she does to me. 🙂
Now I’m terrified that anything I post in Editor’s Corner will be so inferior and completely useless.
I can totally imagine Sam giving you a serve of “Oi, Tatty!”. 🙂
Thanks Del. I’m looking forward to your maiden Editing Corner.
For the record, I have never returned ANYTHING to Del with the opening “Oi, Twatty” 😀 😀 😀 😀
Though you two HAVE given me insane giggles now, which I’m much enjoying 😉
Impressive and helpful. Thank you.
Thanks Brina
Awesome, marvellous and jaw-droppingly cool article Belinda. And so fearsomely clever!**
The macro is still sitting smugly on my customised toolbar, making itself very useful indeed, I can’t wait to start experimenting with the method set out above, though. I can see it coming in handy for all sorts of things 🙂
** Good to see that my recent illness did nothing to dent my sucking-up skillset.
Yep, still sucking up like a boss.
Thanks for the inspiration.